
DIY vs. Professional Headstone Cleaning: When to Call in the Experts
Of all the acts of caring for a final resting place, cleaning a headstone is one of the most tangible and respectful. Over time, the elements take their toll, leaving markers stained, discolored, and obscured by grime. It’s a natural impulse to want to restore the stone to its former dignity, but the method you choose carries significant weight. The decision between a DIY approach and hiring a professional isn't just about cost; it's about preserving history and honoring memory without causing unintended harm.
This guide will help you navigate the delicate balance between a well-intentioned cleaning and a professionally preserved restoration, ensuring your act of care is both safe and effective.
Understanding the Enemy: What’s on the Stone?
Before you even pick up a brush, it's crucial to identify what you're cleaning. Not all grime is created equal, and misidentifying it can lead to irreversible damage. Common culprits include:
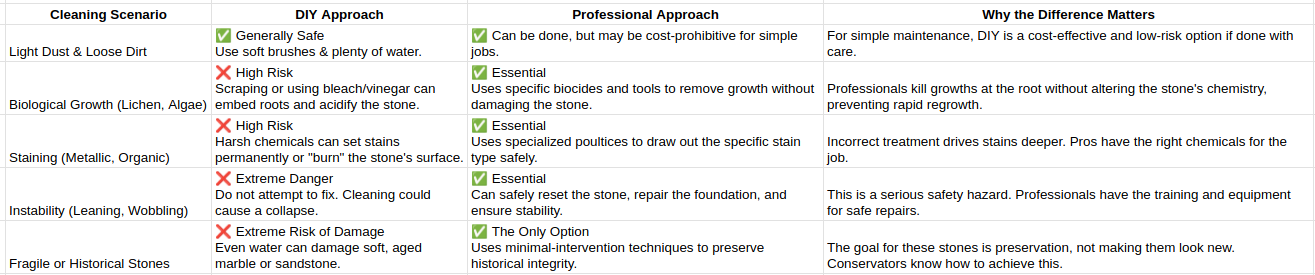
Dust, Dirt, and Light Debris: Loose, dry material sitting on the surface.
Biological Growth: This includes lichen (a symbiotic organism, often crusty or leaf-like), algae (a green, slimy film), and moss. These organisms don't just sit on the surface; they can penetrate the stone.
Stains: Metallic stains from rusting hardware or nearby objects, organic stains from falling leaves and berries, and pollution-based staining.
Graving Dirt: This is dirt that has become embedded in the porous surface of the stone over decades, essentially becoming one with it.
The DIY Headstone Cleaning: A Guide for Simple Maintenance
For simple, modern stones that are structurally sound and only have surface-level dirt, a careful DIY approach can be perfectly appropriate. The goal here is gentle, mechanical cleaning—using physical force rather than harsh chemicals.
The Golden Rule of DIY Cleaning: DO NO HARM.
Safe DIY Materials:
Soft, Natural-Bristle Brushes: Plastic brushes can scratch. Use brushes with boar or other soft natural bristles.
Clean, Lukewarm Water: Lots of it. A bucket and a spray bottle are ideal.
Non-Ionic Detergent: D/2 Biological Solution is the only cleaning solution widely recommended by conservationists for DIY use, as it is specifically designed for stone and is non-abrasive. In a pinch, a very small amount of a mild, non-ionic soap (like Orvus, used in museums) can be diluted significantly in water.
Patience: This is not a job for rushing.
The Safe DIY Process:
Inspect Thoroughly: Check for cracks, instability, flaking, or any signs of delamination (the stone surface peeling away). If you see any, stop. This is not a DIY job.
Wet the Stone: Soak the stone thoroughly with clean water. This helps loosen surface dirt and prevents it from grinding in further.
Gently Agitate: Using a soft brush and plenty of water, gently scrub in a circular motion. Start from the bottom and work your way up to prevent dirty water from streaking down onto dry, clean areas.
Rinse Copiously: Continuously rinse with clean water as you work. Never let a cleaning solution dry on the stone.
Repeat: This process is slow. It may take several cycles of wetting, gentle scrubbing, and rinsing to see a difference.
When DIY Becomes Dangerous: The Case for Professional Monument Cleaning
While the DIY method works for light dusting, there are clear and present dangers when tackling more complex issues. This is where the expertise of a professional monument conservator or cleaner is not just recommended, but essential.
The High Cost of Good Intentions: What Can Go Wrong with DIY
The internet is full of well-meaning but disastrous advice. Here’s why the common "quick fixes" are anything but:
Pressure Washers: The single most destructive tool you can use on a headstone. The high-pressure stream literally blasts the granular surface off the stone, accelerating erosion and destroying carved details. It also forces water deep into cracks, leading to freeze-thaw damage.
Household Cleaners, Bleach, and Vinegar: These are acidic or alkaline chemicals that aggressively react with the minerals in the stone. They can permanently etch the surface, leaving it dull and more porous, which makes it susceptible to faster soiling in the future. They can also leach out the natural color of the stone.
Metal Scrapers and Wire Brushes: These tools are designed to remove material. On stone, they act like a file, gouging and scratching the surface, irrevocably scarring inscriptions and carvings.
Sealants: Applying a store-bought sealant can trap moisture inside the stone, leading to internal cracking and spalling (the surface flaking off).
Finding the Right Professional
If your situation falls into the "call a professional" category, it's vital to find the right one. Look for a company that uses the term "monument conservation" or "restoration." Ask them about their process. They should:
Be happy to discuss their methods and the products they use.
Emphasize the use of non-ionic cleaners and specialized, stone-safe products.
Understand the difference between cleaning a modern granite marker and conserving a 200-year-old marble slab.
Provide references or a portfolio of past work.
The Final Verdict
Cleaning a headstone is an act of remembrance, a way to ensure a name and a story are not lost to time. For a simple, sturdy marker with light dirt, a patient, water-based DIY cleaning can be a respectful and fulfilling task.
But when you face biological growth, stubborn stains, instability, or the delicate surface of an old or historical stone, the most respectful choice you can make is to step aside. Calling in a professional for monument cleaning is not an admission of defeat; it is an investment in preservation. It is the assurance that the memory carved in stone will stand the test of time, honored and intact for generations to come.